Setting up an experiment with MDSplus
Up to now, we have handled data in MDSplus trees. In this tutorial, we shall introduce new data types which do not define straight data, rather actions.
One of the basic feature of MDSplus is in fact the possibility of defining the description of what has to be done during an experiment, when operations have to be done during the sequence, and which actor will actually carry out the specified action. Let's concentrate first on what has to be done during an experiment. Usually a set of electronic devices has to be properly configured when preparing the pulse session, and most of these devices will acquire data during the plasma discharge. Afterwards, acquired data will need to be read from the devices and stored into the pulse file. Moreover, data analysis routines will be executed as soon as the required data is available, possibly storing the result of the computation in the pulse file, which typically will contain both raw and processed data.
Basically, all the operations described before consist in either the activation of a routine from some library, or the execution of a program. Therefore, to specify what has to be done, it suffices to specify either the name of a program or a pair (library name, routine name), possibly with one or more arguments.
As stated before, an action specifies also when the corresponding operation has been done during the experiment sequence. It makes no sense to initialize a device after the discharge, or to call a data acquisition routine before data is available. Therefore it is essential that the operation is executed at the right time. There will be sets of actions which can be executed regardless their respective order, but these will possibly require to be executed before or after another set of actions. To describe such kind of dependence, it is useful to divide the experiment sequence into a set of phases, and to define a sequence number within each phase. Typically, phases INIT, PULSE_ON, and STORE are always defined, but it is possible to define others, in the case a finer granularity is required in the definition of the experiment sequence. Sequence numbers define a partial ordering among actions for a given phase: every action defined for sequence n will be executed after actions defined for sequence number n-1 and before actions defined for sequence number n+1.
The last aspect of an action is the definition of the actor which will actually carry out the specified operation at the specified time. In practice, actors will be processes running on one or more machines. We shall see that a name can be associated with each actor process, and therefore it suffices to specify such name in the action definition.
Inserting actions into a tree
With these concepts in mind, we can now use jTraverser to open our my_tree experiment in edit mode. Let's add a new node, using the popup menu Add node->Action option. After filling the node name, say ACTION_1, we shall see the new node in the hierarchy, with a new icon  . Let's now define its content using the popup menu item Modify Data. We are now prompted for an expression, an we should write a fairly complicated TDI expression specifying all the required information. Of course we are not willing to do so, and therefore we define in the Modify Data popup form the Action option. . Let's now define its content using the popup menu item Modify Data. We are now prompted for an expression, an we should write a fairly complicated TDI expression specifying all the required information. Of course we are not willing to do so, and therefore we define in the Modify Data popup form the Action option.
Two new option menus will appear: that on the left will be used to specify when the action has to be executed (i.e. the dispatching information), and that on the right will specify the kind of operation to be performed.
The choices displayed in the left menu include Sequential and Conditional. The Conditional dispatching mode represents an advanced organization in which actions can be scheduled for execution after the execution of a given set of action. We shall ignore here this option (seldomly used) and we select the Sequential mode, defining sequence numbers. After selecting this mode we get a new form defining the following fields:
- Ident: the name associated with the server process which will actually perform the operation during the sequence;
- Phase: the name of the phase in which the action will be executed;
- Sequence: the sequence number for that action;
- Completion (optional): the name of the MDSplus event to be generated when the action completes (see the tutorial section on MDSplus events);
- Notify: not used yet.
Consider now the other option menu on the right. This menu defines the possible operations which can be associated to an action, and allows the following choices:
- Routine.
- Procedure
- Program
- Expression
- Method
When a routine is defined, the form is changed to show the following fields:
- Image: the name of the library containing the routine. On Linux this will be a .so file, whose directory has to be included in the LD_LIBRARY_PATH environment variable. On Windows this will be a .dll file, whose directory has to be included in the PATH environment variable;
- Routine: the name of the routine.
- Arguments: The list of optional arguments which are passed to the routine.
When a procedure is defined, the following fields are displayed:
- Procedure: the name of the command procedure to be executed;
- Language: the language of the procedure (e.g. IDL)
- Arguments: the arguments to be passed to the procedure.
When a program is defined, the following field is displayed:
- Program: the filename of the program to be launched.
When an expression is defined, the corresponding operation is the evaluation of the specified expression. Recall that expressions are very flexible, and can be composed of a sequence of statements, thus behaving as a program written in the TDI language.
Finally it is possible to define a Method. Methods are operations associated with the devices involved in the experiment and represent in practice the most common type of operation executed during the shot sequence.
Every hardware device used in data acquisition is represented in the experiment model by a set of nodes, forming a subtree. Devices of the same type are represented by the same subtree structure. This is very similar to the definition of an Object in Object Oriented programming, and MDSplus defines a new data type, called Conglomerate, for this purpose. As an object instance contains a set of fields and defines a set of methods, a MDSplus device defines a subtree structure and a set of methods which can be declared in an action. For example, a transient recorder device will define an INIT method, which will be called before the shot for the device initialization, and a STORE method called after the shot for data readout.
MDSplus devices define also a constructor method, called ADD which is invoked when the associated subtree has to be added to the tree. You implicitly call this method when adding a new device using jTraverser in edit mode. We do so by selecting the Add device item in the popup menu, which prompts then for the type of the device and the name of the device top node (i.e. the root of the subtree).
We can now understand the meaning of the fields which are displayed when Method is selected for an action:
- Device: the path name (or tag) of the device top node;
- Method: the name of the method to be executed.
The current implementation of MDSplus defines a fairly large set of supported devices, but it is possible to develop new devices to support new hardware. The the next tutorial will explain how.
There is also another field which is always displayed unless an expression is defined. This field defines a timeout value and defines the action timeout (in seconds). If a value is assigned to the timeout and if the operation does not terminate within the specified time, the executing thread is discarded and the action is assumed to be aborted, so that the sequence can continue with the following actions.
Let's now extend our MY_TREE experiment model by adding three actions: ACTION_1, ACTION_2 and ACTION_3 with the following configuration:
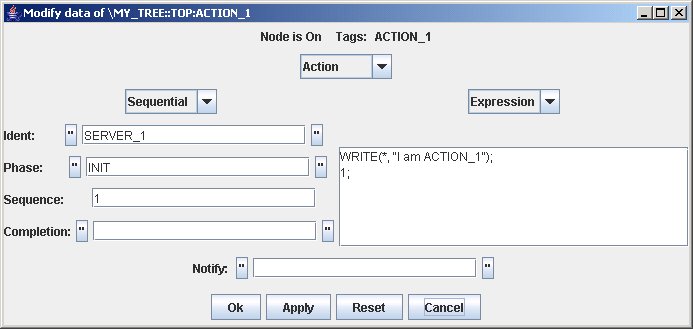
ACTION_1 defines an action composed of a TDI expression, which gets evaluated at the time this action is executed. The TDI expression is composed of two TDI statements: the first one writes a message, and the second one represents the value which is returned by the evaluation od the expression (odd status in MDSplus means success). ACTION_1 will be executed in phase INIT, with a sequence number of 1, by server SERVER_1.
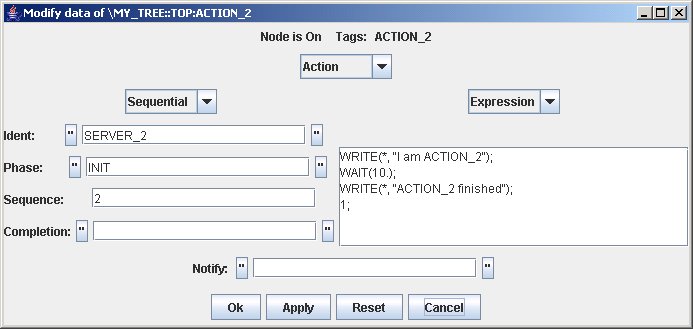
The configuration of ACTION_2 is quite similar to that of ACTION_1. Only the message , the sequence number and the server are changed. This mean that ACTION_2 will be executed after ACTION_1 by another server.
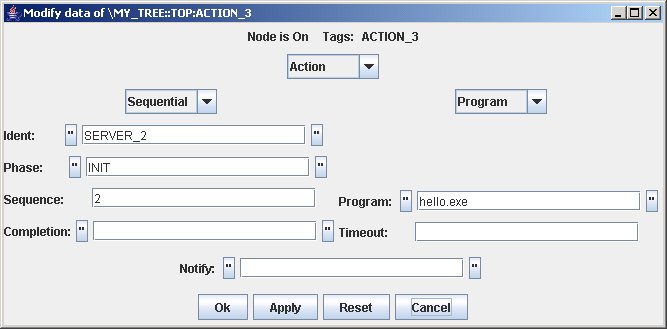
In this case ACTION_3 executes a program. The path name of the program is provided in field Program The sequence number is the same as ACTION_2, so we cannot state which action will be executed first (both however after ACTION_1). The server is SERVER_2, and therefore this action will be executed by the same server of ACTION_2.
Let's also add a device (with the tree open in edit mode) by adding device MY_ADC , by selecting the Add Device popup item. Once the item has been selected the following window is displayed.
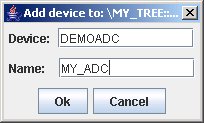
The first field defines the kind of device being added (DEMOADC this is a demo device, available in the current MDSplus distribution, which defines two dummy methods: INIT and STORE.) The second field defines the name of the device, actually the name of the root of the subtree containing the data items associated with the device.
Once the device has been added you can see that a subtree has been created, including two actions called INIT and STORE. If, for example you look at the INIT action, you will see the following configuration:
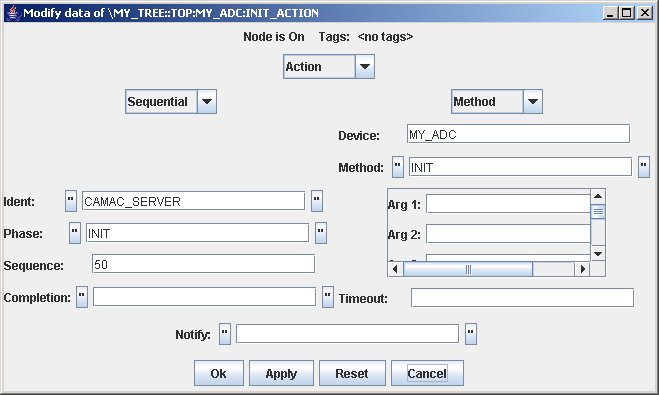
This action specifies method INIT (for device type DEMOADC) applied to the device instance called MY_DEVICE. The method will be invoked during phase INIT at sequence number 50 (therefore after ACTION_1, ACTION_2 and ACTION_3) by the server named CAMAC_SERVER.
Now our test experiment is completed, and we are ready to discover three new MDSplus tools: jServer, jDispatcherIp and jDispatchMonitor. These tools are written in Java, and represent the evolution of the server and dispatcher tools, also available in MDSplus. This tutorial will concentrate on the java tools, but it will be also shown also how to use the previous ones at the end of this tutorial.
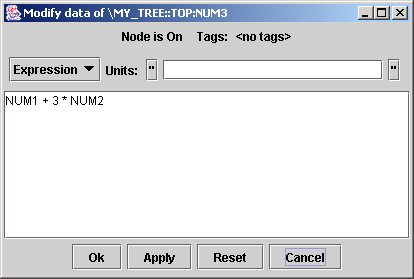
If you want to have a look at the resulting TDI expressions in the action nodes read [this].
Defining a Sequence
Once the experiment model has been configured to include all the required actions, we use jDispatcherIp and jServer for running the experiment sequence. jDispatcher collects action information from the experiment model and schedules actions to one or more jServer processes, running on the same machine and/or on different machines. The jServer tasks will carry out the scheduled actions, and will communicate to jDispatcher the completion (successful or unsuccessful) of the action, so that the jDispatcher can proceed with the following actions. If more than one server is defined, it is possible to have several actions concurrently in execution (i.e. actions with the same sequence number within the same phase).
Before proceeding in setting up a demo session using the experiment model MY_TREE we have just built, it is worth spending some more words on the meaning of the action field ident. This field contains a name, and is used by jDispatcher to find out the corresponding server. Some actions may be executed by any available server, such as programs doing data analysis, but others cannot. For example, a CompactPCI device initialization can only be executed by a jServer task running on the Control CPU for that CompactPCI crate. jDispatcher provides a flexible mapping for actions via the action field ident. This field contains a a string, and a string is also associated with every jServer. jDispatcher will therefore dispatch an action to the jServer associated with the same name as the action's ident field content. It is also possible to run more than one jServer associated with the same name. In this case jDispatcher will choose the less loaded jServer task for action dispatching among those associated with the the name contained in the action's ident field. Such an option is useful when a farm of processors is available to carry out online computation during the pulse sequence. jDispatcher also provides dynamic action balancing in a set of equivalent jServers (i.e. associated with the same name) by moving run-time actions from the queue of an overloaded jServer into another unloaded equivalent jServer. A default jServer will receive actions for which no jServer is associated with the action's ident content.
jDispatcher requires a property file, called jDispatcher.properties, which specifies several parameters among which is the list of jServer tasks, and the associated name. Before looking into detail at the content of the file jDispatcher.properties, it is worth spending some more words on how jDispatcher interacts with the outside world. We have already seen that jDispatcher communicates with a set of jServer tasks. This is done via mdsip, the same TCP/IP protocol used by MDSplus to access remote data. To specify the nth jServer, it suffices therefore to declare the following fields in jDispatcher.properties:
- jDispatcher.server_<n>.class: the name associated with the jServer task, used by jDispatcher to discriminate among servers;
- jDispatcher.server_<n>.address: the IP address and port specification of the jServer task, running at the specified IP address and listening at the specified port number. Its form is <IP address>:<port>
jDispatcher, in turn, may receive the following commands from the outside:
- set tree <tree_name>: instructs jDispatcher to use the specified experiment model for retrieving action information;
- create pulse <n>: we have seen in the first tutorial that the pulse files are defined by a shot number, and that they are created from a given experiment model whose shot number is, by default, -1. This command, issued before starting a sequence creates a new pulse file from the current experiment model;
- build tables: jDispatcher internally uses a set of dispatching table to co-ordinate the shot sequence. When this command is received, jDispatcher builds its private structures, based on the current content of the action nodes in the current pulse file. This command is normally issued after the two commands above and before starting the pulse sequence;
- dispatch/phase = <phase_name>: start dispatching the actions defined for the given phase (recall the the phase name is a field of the action data structure). The order of the action executions will be dictated by the dispatching information associated with each action;
- close tree: issued at the end of the last phase, closes the open pulse file and relinquish resources.
The mdsip protocol is still used to send command to jDispatcher, and therefore the jDispatcher java class is embedded into a jDispatcherIp java class which behaves as a mdsip server, i.e. a server listening to mdsip messages, and recognizes the specific dispatching messages (those listed above). The field jDispatcher.port of jDispatcher.properties specifies the the port at which jDispatcher listens for incoming mdsip messages. The client for jDispatcher, i.e. the entity sending the mdsip messages specifying the above commands may be every program acting as mdsip client, i.e. performing remote evaluation of the corresponding expression. In practice, there is no need to write such a program, since these commands are already provided by the Tree Command Language (TCL), we have already seen in the first tutorial. The TCL commands for issuing the commands listed above are the following:
- TCL> dispatch/command/server=<jDispatcher IP address>:<jDispatcher port> set tree <tree_name>
- TCL> dispatch/command/server=<jDispatcher IP address>:<jDispatcher port> create pulse <n>
- TCL> dispatch/command/server=<jDispatcher IP address>:<jDispatcher port> build tables
- TCL> dispatch/command/server=<jDispatcher IP address>:<jDispatcher port> dispatch/phase=<phase_name>
- TCL> dispatch/command/server=<jDispatcher IP address>:<jDispatcher port> close tree
The syntax for these commands is somewhat lengthy, but you can embed these commands into some TCL command files and forget about them (see the example later in this section). We are now ready to see the whole content of jDispatcher.properties for this demo application:
#The port at which jDispatcherIp listens to incoming commands
jDispatcher.port = 8001
#server classes and addresses
jDispatcher.server_1.class = SERVER_1
jDispatcher.server_1.address=localhost:8002
jDispatcher.server_2.class = SERVER_2
jDispatcher.server_2.address=localhost:8003
#default server id: used by jDispatcher when an unknown server is found
jDispatcher.default_server_idx = 1
#phase names and corresponding identifiers
jDispatcher.phase_1.id = 1
jDispatcher.phase_1.name = INIT
jDispatcher.phase_2.id = 2
jDispatcher.phase_2.name = PULSE_ON
jDispatcher.phase_3.id = 3
jDispatcher.phase_3.name = STORE
# The ports used by jDispatcher to export information to jDispatchMonitor
jDispatcher.monitor_1.port = 8010
jDispatcher.info_port = 8011
In the listed configuration, two jServer tasks are declared, both running on the same machine, and listening at port 8002 and 8003, respectively. The associated names are SERVER_1 and SERVER_2, the same names we declared in the ident field for ACTION_1 and ACTION_2. Observe that the default ident content for actions INIT and STORE, belonging to the subtree associated with device MY_DEVICE we added before, is CAMAC_SERVER. jDispatcher will dispatch such actions to SERVER_1, because this server is defined as the default server. The properties file contains also the definition of the phases used in the sequence, and an associated id: normally you write this once to include the phases you have defined and then forget about it. The last two lines are required by jDispatcherMonitor, which is the Graphical interface of jDispatcher. jDispatchMonitor can run on a different machine, and uses TCP/IP to get information from jDispatcher. The ports used by jDispatcher for this purpose are listed in the last two lines of the sample property file. If you are running jDispatchMonitor on a different machine, recall that a copy of file jDispatcher.properties is required in the working directory of jDispatchMonitor.
Putting all together
We are now almost ready to run the experiment MY_TREE. As ACTION_3 defines a user program, we need to provide first an implementation for program demo, such as the following one (in demo.c):
public void main(int argc, char *argv[]) {
    printf("Hello, I am a C program");
}
Compile and link demo.c and make sure that the environment variable PATH contains its directory.
The task associated with ACTION_1 and ACTION_2 is a TDI expression which, when evaluated, prints a message. The actions coming with device MY_DEVICE (of type DEMO_ADC) define methods INIT and STORE, respectively, which, besides making other operations (see the next tutorial), print a message.
To run the sample sequence defined in experiment MY_TREE, we need to do (after making sure that the jar files jScope.jar, jTraverser.jar and jDispatcher.jar are contained in the CLASSPATH definition):
- Start two jServer applications (on two separate terminal window), by issuing the commands
java jServer 8002
and
java jServer 8003
- In the same directory containing jDispatcher.properties, start jDispatcher by issuing the command
java jDispatcherIp my_tree
(the name jDispatcherIp comes from the fact that the main class for the dispatcher handles mdsip messages)
- Start the GUI for jDispatcher by issuing the command:
java jDispatchMonitor localhost:8010
in the case jDispatchMonitor is running on a separate mahine, specify the IP address of jDispatcher in the command line.
- Prepare the following script files for TCL (just to avoid typing long commands):
init.tcl
dispatch/command/server=localhost:8001 set tree MY_TREE
dispatch/command/server=localhost:8001 create pulse P1 dispatch/command/server=localhost:8001 build tables
dispatch/command/server=localhost:8001 dispatch/phase=INIT
pon.tcl
dispatch/command/server=localhost:8001 dispatch/phase=PULSE_ON
store.tcl
dispatch/command/server=localhost:8001 dispatch/phase=STORE
dispatch/command/server=localhost:8001 close tree
Note (Nelson):
I think these should be:
init.tcl
dispatch/command/server=localhost:8001 set tree MY_TREE
set current MY_TREE/increment
dispatch/command/server=localhost:8001 create pulse 0
dispatch/command/server=localhost:8001 dispatch build
dispatch/command/server=localhost:8001 dispatch phase INIT
pon.tcl
dispatch/command/server=localhost:8001 dispatch phase PULSE_ON
store.tcl
dispatch/command/server=localhost:8001 dispatch phase STORE
dispatch/command/server=localhost:8001 close tree
and issue the following commands from TCL (in another terminal window):
TCL> @init 1
TCL> @pon
TCL> @store
If everything works, you will see the messages on the jServer terminals. At the same time you will see the sequence information in the graphical user interface of jDispatchMonitor. If things do not work......check better what you have done: be careful, you are running a Nuclear Fusion Experiment!
Now let's make some variations. First of all let's change the expression representing the task for ACTION_2 by adding a wait command and another print command, as follows:
write(*, "Hi, I am ACTION_2");
wait(10.);
write(*, "ACTION_2 finished");
1;
Now ACTION_2, defined to be run at phase INIT with sequence number 2 will take more time to be executed. ACTION_3 is also defined to be run at phase INIT with sequence number 50, so there is a chance that the latter action needs to for wait the termination of ACTION_2 before being executed. Actions with the same sequence number may be in fact dispatched in any order. To make sure that both actions are executed soon, we can add a third jServer task, listening, say, at port 8004. So we add the following lines in jDispatcher.properties:
jDispatcher.server_3.class = SERVER_2
jDispatcher.server_3.address=localhost:8004
Let's repeat the shot sequence, after re-launching the dispatcher and the dispatch monitor: this time the two actions are both executed soon, because the dispatcher has the chance of associating a separate (equivalent) server with ACTION_2 and ACTION_3.
Now let's kill the jServer we just launched. A message in the jDispatcher terminal will warn us that a server died, but no worry, jDispatcher is fault tolerant, and knows what to do, provided at least one instance of the default server is running. Note that you can run a subset of the servers declared in jDispatcher.properties. A list of declared and running servers is displayed by jDispatchMonitor by selecting Info->Show server option. At any time a new jServer task can join jDispatcher, provided it has been declared in the properties file.
Another useful feature of jDispatcher is the possibility to abort an action which, for some reason hangs. To exercise this, let's change the wait time in the TDI program associated with ACTION2, and port it to, say, 1000 seconds. When you execute the INIT phase, the whole system will wait the termination of such action. To abort it, select the action in jDispatchMonitor GUI and then click the popup option "Abort". In response, jServer will discard the thread actually executing the action, so that jDispatcher can proceed with the other actions.
You can also manually re-dispatch an executed actions, once the phase has terminated, via the popup option "Redispatch".
Dispatching and serving actions without Java
If you do not have a Java Virtual Machine running on the server side (or if you hate Java), you can avoid jServer, and use the mdsip server instead. The command for running an action server is the following:
mdsip -p <server port number> -s -h <hosts file location>
as you can see, the command is almost identical to the usual command for running a mdsip server. The only difference is the -s option (instead of the -m option used to run a mdsip data server).
You need however to instruct the dispatcher that it is going to communicate with a mdsip server by adding the following line in the server-specific definition:
jDispatcher.server_<n>.use_jserver = false
The only restriction in this case is that in this case it is no longer possible to abort actions which hanged.
A C version of the action dispatcher is also available in MDSplus, embedded in the TCL tool. In this case you can use TCL directly by means of the following commands:
TCL> set tree <tree_name>
TCL> create pulse n
TCL> build tables
TCL> dispatch/phase=<phase_name>
We have already seen the first two commands (open an experiment model and create a pulse file). The third command creates the internal dispatching tables, based on the configuration of the actions defined in the pulse file, and the fourth command starts the sequence for the actions declared in the specified phase. To associate servers with names, it is necessary to define for every server the following environment variable:
server_name = <server IP>:<server port>
Some features are missing in this version, namely:
- The possibility of running multiple servers associated with the same name
- Dynamic load balancing
- The possibility of aborting actions
- The Graphical User interface
- More sophisticated dispatching definitions (not explained in this tutorial)
What next
While in the previous tutorials we learned how to access MDSplus data, we have learned here how to perform data acquisition using MDSplus. A further step is however required: when acquiring data we use some kind of hardware device, requiring some kind of programming. Several devices are already supported in the current MDSplus distribution, and, if you are lucky, the device you are going to use is already available. More probably, you will need to integrate device support code into MDSplus. The next tutorial will show you how to do it.
|


