From MdsWiki
| Revision as of 07:09, 13 September 2012 (edit) Manduchi (Talk | contribs) (→Some examples) ← Previous diff |
Revision as of 07:25, 13 September 2012 (edit) Manduchi (Talk | contribs) (→Some examples) Next diff → |
||
| Line 66: | Line 66: | ||
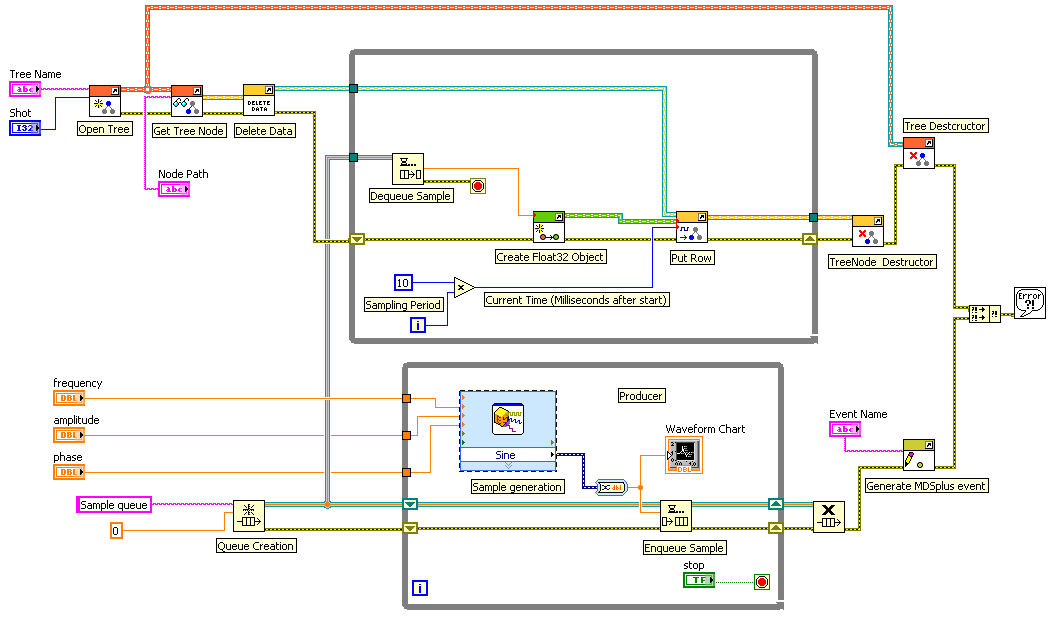
| In this example two loops run concurrently. In the bottom loop a sinusoidal waveform of given frequency, amplitude and phase is generated at a sampling frequency of 100 Hz and its values are stored in a queue and the values are also shown in a Waveform chart.<br /> | In this example two loops run concurrently. In the bottom loop a sinusoidal waveform of given frequency, amplitude and phase is generated at a sampling frequency of 100 Hz and its values are stored in a queue and the values are also shown in a Waveform chart.<br /> | ||
| The enqueued samples are dequeued in the upper while loop and passed to a ''Float32 Create'' VI. The time corresponding to the dequeued sample, assumed in milliseconds starting from the beginning of the execution, is computed and passed to the ''TreeNode PutRow'' VI together with the data sample and the TreeNode reference. This VI will append the new sample in the corresponding signal stored in the pulse file. <br /> | The enqueued samples are dequeued in the upper while loop and passed to a ''Float32 Create'' VI. The time corresponding to the dequeued sample, assumed in milliseconds starting from the beginning of the execution, is computed and passed to the ''TreeNode PutRow'' VI together with the data sample and the TreeNode reference. This VI will append the new sample in the corresponding signal stored in the pulse file. <br /> | ||
| + | ===Storing ADC Data in the pulse file=== | ||
| + | While in the previous example data were stored in the pulse file point by point, in this example, blocks of data samples are written in the pulse file. This approach is convenient when the sampling speed is higher as it would not be possible to sustain the data flow storing each sample separately on disk (i.e. doing many I/O operation). When larger blocks of data are written in single I/O operations a much | ||
| When the user hits the stop button, the bottom loop exits, the queue is destroyed and an MDSplus event, corresponding to the specified Event Name, is generated by ''Event Set Event'' VI. This event can be used, for example, to trigger visualization in a MDSplus Data Visualization Tool (jScope) showing the whole acquired waveform as soon as it has been completely stored. As a consequence of the deallocation of the queue, the upper loop exits, too, and the Tree Node and | When the user hits the stop button, the bottom loop exits, the queue is destroyed and an MDSplus event, corresponding to the specified Event Name, is generated by ''Event Set Event'' VI. This event can be used, for example, to trigger visualization in a MDSplus Data Visualization Tool (jScope) showing the whole acquired waveform as soon as it has been completely stored. As a consequence of the deallocation of the queue, the upper loop exits, too, and the Tree Node and | ||
| Tree instances are deallocated and consequently the pulse file is closed. Observe that the Float32 instance is not explicitly deallocated in the program, due to the deallocation policy of Data objects, because it is passed as argument to another VI. <br /> | Tree instances are deallocated and consequently the pulse file is closed. Observe that the Float32 instance is not explicitly deallocated in the program, due to the deallocation policy of Data objects, because it is passed as argument to another VI. <br /> | ||
| [[Image:LabVIEW_Fig11.gif]]<br /> | [[Image:LabVIEW_Fig11.gif]]<br /> | ||
Revision as of 07:25, 13 September 2012
Contents |
The LabVIEW interface to MDSplus objects
This new LabVIEW interface uses the recent LabVIEW Object Oriented interface called LVOOP. In LVOOP class methods are represented by Virtual Instruments (VIs) named Class Member VIs. The MDSplus interface provides a one-to-one mapping between MDSplus Data and Tree objects and the LabVIEW classes and we shall see how, thanks to the graphical interface of LabVIEW, this mapping become intuitive and easy to export the full functionality of MDSplus into LabVIEW. After an introduction of the basic concepts, this tutorial will explain the usage of this interface by means of some example, covering the most common use cases of MDSplus.
Installation
NOTE: the following installation steps refer to Windows version of LabVIEW 2010. Different platforms and version may require slightly different steps.
The LabVIEW interface is installed from the CVS distribution of MDSplus in the following steps:
- Make sure that the latest version of MDSplus is installed, in particular that library MDSobjectsLVShr.dll is present;
- From the CVS MDSplus distribution copy the whole directory <MDSplus root>\mdsobjects\labview\MDSplus into directory <LabVIEW root>\vi.lib;
- From LabVIEW, open project <LabVIEW root>\vi.lib\MDSplus\MDSplus.lvproj
When the project is open, the following window is shown:
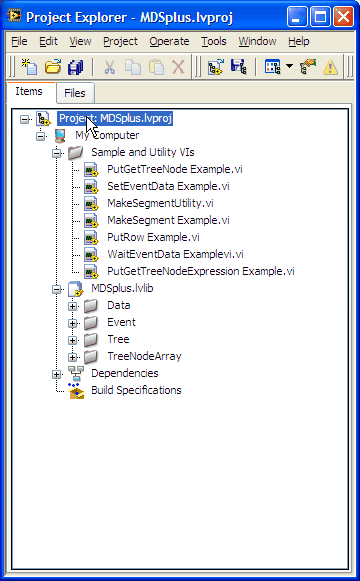
The folder Sample and utility VIs contains the examples which will be covered in this tutorial. MDSplus.lvlib contains the classes and the methods of the ionterface, which are further divided into folders Data (Data classes), Event (Event classes) Tree (Tree classes) and TreeNodeArray (still in development, not covered in this tutorial).
If we expand for example the Data folder the following is shown:
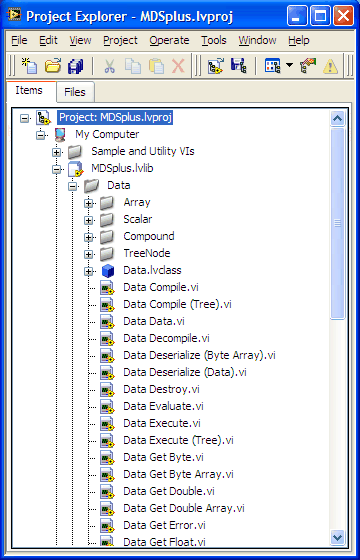
The displayed VIs represent the VIs to be used when manipulating Data objects. Data derived classes are stored in the shown subfolders (Array, Scalar, Compound, TreeNode). The direct class member VIs are contained in Data.lvclass, but it is recommended that users use the VIs outside the <Class name>.lvclass folder. See the following figure referring to Data class Int32.
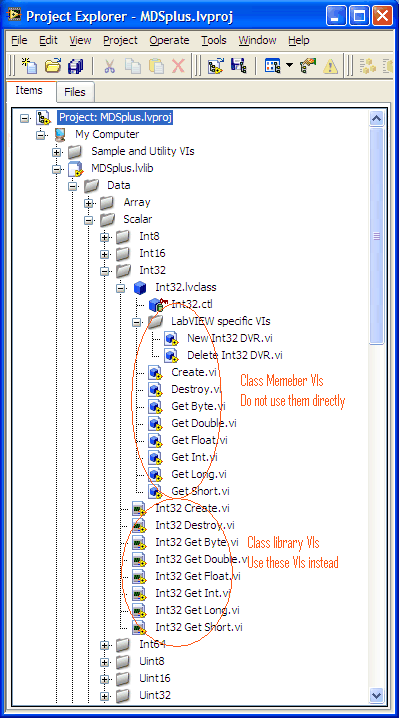
The reason for using the library VIs instead of the class member VIs is subtle but nevertheless important: when using library VIs for MDSplus class methods the object instances are not passed directly, but a reference to the object is used instead. Even if this is transparent to the programmer, in the latter case possible deallocation errors (see deallocation section below) are trapped by LabVIEW and do not crash the application.
Class library VIs can be dragged directly from the project window, but a palette is also available. The following steps are required to install the palette:
- Select Tool->Advanced->Edit Palette Set...
- Within the shown window, select the popup menu Insert->Subpalette and select "Link to an existing palette file (.mnu)" option
- Select <LabVIEW root>\vi.lib\MDSplus\MDSplus.mnu
Data classes
Most MDSplus class inherit from the Data class. MDSplus handles a large variety of data types, including scalars and multidimensional arrays, and other data types derive from the composition of data instances.
This flexible data management fits naturally into the Data class hierarchy. Every data item managed by MDSplus is seen as a generic instance of Data, its actual representation being carried out by the concrete Data subclass. This subclass may be as simple as a scalar 4-byte integer value represented by the Int32 class, or as complex as an expression representation formed to a hierarchy of data instances corresponding to the expression parse tree.
The Data superclass defines a set of generic methods for data evaluation which are then implemented by its subclasses. For example, Data method getInt() returning a C int type, will return the associated integer field for a Int32 class, and will imply the online evaluation of the associated expression for not atomic data classes.
For the simplest data types, corresponding to scalars and arrays, the actual value of the data instance is typically passed as an argument to the class’ constructor.
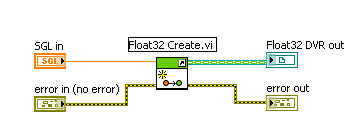
The creation of a new Data instance in LabVIEW is quite similar. For example, the constructor VI of the following figure creates a new instance of the Float32 data type, representing a single precision floating point number. The VI has an input wire for the assigned numeric value and the created Data instance is returned in the output wire on the right. Another output wire brings error information, following the usual error management approach of LabVIEW.
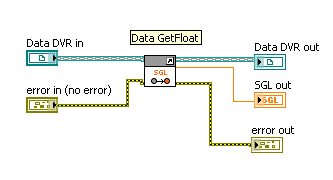
Accessor (getter) methods allow retrieving the associated value from a Data instance. In the following figure the getFloat VI returns the content of the passed Data instance as a single precision floating point number. The input wires are the references to the Data object and the error stream, respectively. The output wires are the same reference to the Data instance, the returned value and the output error stream, respectively.
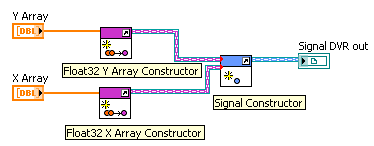
Composite Data instances are created in LabVIEW from the data instances of their components. For example, a Signal Data instance can be created from two Float32Array Data instances representing the Signal values and times, respectively. The two Float32Array instances are connected to the Signal Constructor VI via the input wires and the Signal instance is returned in the output wire.
Tree Classes
Class Tree represents an instance of pulse file, which is open when the class is instantiated. Class Tree is not used directly to read and write data, but TreeNode instances can be obtained from the Tree instance, each representing a given data item in the pulse file hierarchy, and used to read and write data.
Every TreeNode may contain a data expression, and TreeNode’s methods getData() and putData() will read and write instances of Data objects, represented by any Data derived class instance.
The usage of Tree and TreeNode LabVIEW objects is shown in the example below.
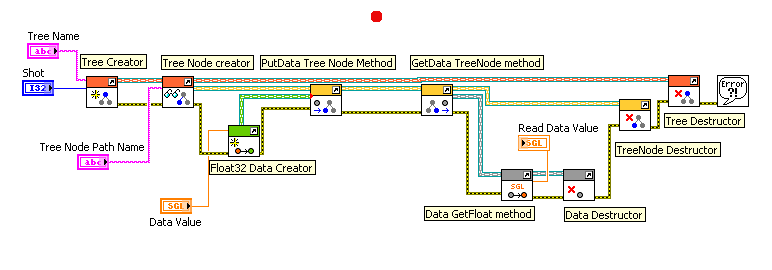
A Tree instance is first created by the Tree constructor VI, whose input wires specify the name and the shot number of the corresponding pulse file, and whose output wires bring the created Tree instance and the error stream. The Tree instance is the input wire of the TreeNode constructor VI, which accepts also as input the path name of the corresponding data item in the pulse file hierarchy. The output wire bringing the TreeNode instance is then used (from left to right) to write a float scalar and to read it back. A Data input wire for the putData VI specifies the data item to be written in the pulse file, and a data wire is returned by getData VI which reads the data item corresponding to the passed TreeNode instance. Finally, Data accessor getFloatValue VI is used to retrieve the data content as a float value.
The Data instance is then deallocated as well as the Tree and TreeNode instances. Refer to the following section for a more detailed discussion.
Data and Tree instances deallocation
In LabVIEW memory resources are automatically freed when no more needed, and deallocation is therefore not controlled by the user program. It is however not possible to delegate memory resource allocation control in the MDSplus object layer because here memory is not only allocated by LabVIEW, but also by the underlying C++ library. For this reason a set of deallocator VIs is available and should be used to avoid memory leaks.
Tree and TreeNode instances should be deallocated when no more needed, as well as every Data instance. In practice, freeing every Data object would complicate programming quite a bit. For this reason, deallocations are carried ou by the MDSplus method VIs when Data objects are received as input.
The programmer’s rules becomes therefore the following:
- Tree and TreeNodes instances are deallocated when no more required in the program;
- Data objects returned by accessor (getter) methods of other Data objects are not deallocated (e.g. the returned dimension of a Signal Data object);
- Data objects created in the program or returned by TreeNode methods should be deallocated when no more used ONLY when NOT passed to any other VI.
The above example shows a correct deallocation policy where Float32 Data objects passed to putData VI are not explicitly deallocated. Conversely, the Data object returned by getData VI is deallocated when no more used, i.e. after extracting its associated float value. Tree and TreeNode are deallocated in the program when no more needed, i.e. when the pulse file, is closed.
Event Classes
MDSplus events are based on UDP messages (recall that env variable UDP_EVENTS must be set to 1) and are used to synchronize separate components in data acquisition systems. An event is uniquely identified by its name and can bring any Data instance whose byte size is not greater than a UDP datagram (64 kBytes).
Event management is carried out by class Event, whose constructor requires the name of the event. Event Wait VI suspends the execution of the calling thread until an event with the corresponding name is generated. Event Wait Data VI, in addition, returns the Data instance associated with the event (if any). Static method VI Event Set Event (i.e. not necessarily requiring an Event instance) will issue an event corresponding to the name. Method VI Event Set Event(Data) accepts also the Data instance to be passed along with the event.
In the following example an Event object is created (Event Creator) and the returned instance is used to wait the corresponding event and the associated data, which is then displayed converted to a float value.

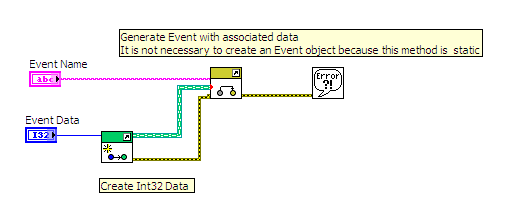
The generation of an Event with associated data is shown below. Here, an instance of Int32 Data is passed to the Set Event VI. Observe that since Set Event is a static method there is no need to create an Event instance before.
Some examples
Reading and Writing expressions
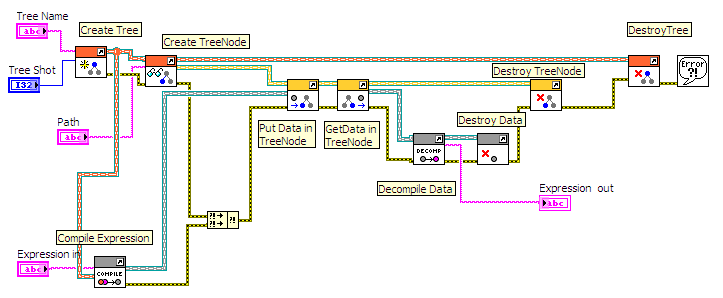
In this example a generic expression is written and read in the pulse file. In order to create a Data object corresponding to a given expression it is convenient to use either Data Compile or Data Compile (Tree) VI. The second VI should be used when the expression contains references to data items in the pulse file and the tree reference is used to specify to which tree the data items refer to (recall that more than one pulse file can be open during execution).
The created Data object is passed to the TreeNode PutData VI connected also the TreeNode reference obtained by Tree GetNode VI. The data item is then read fro the pulse file via TreeNode getData VI and returned as a Data object. Its content (the written expression) is then decompiled by Data Decompile VI and then freed by Data Destroy VI (it is no more used and is not passed to any other VI). Finally TreeNode and Tree objects are freed by TreeNode Destroy and Tree Destroy VIs.
Storing trend data in the pulse file
Trend data are typically continuous data which are produced at frequency not too high (typically up to 100 Hz). For this kind of signal it is convenient to use the PutRow method of TreeNode class which appends a single data point into the saved waveform. As soon as the data has been appended, the whole waveform can be read from the pulse file.
A Tree and a Tree Node objects are first instantiated (top left VIs) by a Tree Create VI and a Tree GetNode VI, respectively. Consequently the tree defined by the control items Tree Name and Shot is open and the Tree Node object corresponding to control item Node Path is retrieved. Data contained in the corresponding tree node, if any, is deleted by a TreeNode Delete Data VI.
In this example two loops run concurrently. In the bottom loop a sinusoidal waveform of given frequency, amplitude and phase is generated at a sampling frequency of 100 Hz and its values are stored in a queue and the values are also shown in a Waveform chart.
The enqueued samples are dequeued in the upper while loop and passed to a Float32 Create VI. The time corresponding to the dequeued sample, assumed in milliseconds starting from the beginning of the execution, is computed and passed to the TreeNode PutRow VI together with the data sample and the TreeNode reference. This VI will append the new sample in the corresponding signal stored in the pulse file.
Storing ADC Data in the pulse file
While in the previous example data were stored in the pulse file point by point, in this example, blocks of data samples are written in the pulse file. This approach is convenient when the sampling speed is higher as it would not be possible to sustain the data flow storing each sample separately on disk (i.e. doing many I/O operation). When larger blocks of data are written in single I/O operations a much
When the user hits the stop button, the bottom loop exits, the queue is destroyed and an MDSplus event, corresponding to the specified Event Name, is generated by Event Set Event VI. This event can be used, for example, to trigger visualization in a MDSplus Data Visualization Tool (jScope) showing the whole acquired waveform as soon as it has been completely stored. As a consequence of the deallocation of the queue, the upper loop exits, too, and the Tree Node and
Tree instances are deallocated and consequently the pulse file is closed. Observe that the Float32 instance is not explicitly deallocated in the program, due to the deallocation policy of Data objects, because it is passed as argument to another VI.
